5 Post-Winter Basement Waterproofing Tips to Protect Your Home from Thawing Ground
Spring thaw exposes hidden winter damage in Long Island basements. Learn the 5 critical post-winter checks that prevent costly water damage and protect your home's foundation.
Share:

Summary:
That snow piled against your foundation isn’t just melting—it’s testing every weak point winter created in your basement walls. Spring thaw hits Long Island homes harder than most regions because our freeze-thaw cycles turn hairline cracks into water highways. You’re not imagining that damp smell or those new stains on your basement floor. Winter left damage behind, and thawing ground is about to make it obvious. These five post-winter checks stop small problems before they become expensive emergencies, and if you’ve been thinking about using your tax refund for home improvements, basement waterproofing delivers protection that pays back in peace of mind and property value.
Why post-winter basement waterproofing matters in Nassau and Suffolk Counties
Long Island sits on varied terrain where sandy coastal soil meets clay-heavy inland ground, and that variation creates unique spring challenges. What works in Long Beach won’t necessarily protect a home in Syosset because the soil drains completely differently.
Winter freeze-thaw cycles do real damage here. Water seeps into foundation cracks during wet periods, then freezes when temperatures drop. Ice expands with serious force, widening those cracks and creating new pathways for water. By the time spring arrives, your foundation has been through months of this expansion-contraction stress.
When the ground thaws, all that accumulated snow and ice becomes water with nowhere to go. Frozen soil can’t absorb it, so it pools against foundations and finds every crack, gap, and weak point winter created. The pressure builds fast, and basements that stayed dry all winter suddenly show water in basement after rain or even on clear days as snowmelt continues.
How freeze-thaw damage shows up after winter
Most homeowners don’t realize winter damaged their foundation until spring thaw reveals the evidence. You might notice new cracks in basement walls or floors that weren’t there last fall. Existing cracks often appear wider or longer after a harsh winter.
Water stains are another telltale sign. White, chalky deposits called efflorescence appear where water evaporates through concrete, leaving mineral residue behind. These stains mark active moisture movement through your foundation, even when you don’t see standing water.
That musty smell in basement spaces isn’t normal. It signals moisture problems that developed during winter and worsened as temperatures rose. Mold needs water to grow, and it starts establishing colonies within 24 to 48 hours of moisture exposure. By the time you smell it, there’s already growth happening behind walls or under flooring.
Spring also reveals foundation movement. Doors that suddenly stick, windows that won’t open smoothly, or new gaps between walls and trim all suggest your foundation shifted during freeze-thaw cycles. This movement creates openings for water infiltration.
The combination of winter damage and spring thaw creates perfect conditions for basement problems. Weakened foundations meet intense water pressure from melting snow and spring rain. Without intervention, minor issues escalate into flooding, structural damage, and mold growth that threatens your home’s integrity and your family’s health.
Long Island’s high water table makes these problems worse. Many Nassau and Suffolk County properties sit above underground streams and naturally elevated groundwater levels. When spring thaw adds surface water to already saturated soil, the pressure against foundation walls intensifies. That’s why homes that stayed dry for years suddenly experience leaking basement walls after a particularly harsh winter.
The connection between tax refund timing and spring home improvements
Tax refunds typically arrive between late February and early April—exactly when Long Island homeowners start noticing post-winter basement problems. That timing isn’t coincidental. It’s actually strategic for tackling waterproofing projects before spring storms arrive.
Refunds in 2026 are running about 20% larger than previous years, giving homeowners more flexibility to invest in protective home improvements. Basement waterproofing ranks high on smart investment lists because it prevents damage rather than reacting to it. The cost of waterproofing a basement in Nassau or Suffolk County typically ranges from $2,800 to $11,400 depending on the scope of work needed, with most comprehensive interior solutions falling between $5,000 and $8,000.
That might sound like a significant investment, but consider what you’re protecting. A wet basement is one of the biggest red flags for potential buyers. It can tank your property value and make your home nearly impossible to sell. Professional waterproofing often adds more value than it costs, especially when backed by warranties that transfer to new owners.
Spring maintenance also costs less than emergency repairs. When you address foundation cracks and waterproofing needs before heavy spring rains arrive, you’re choosing the work on your terms. Wait until water is actively flooding your basement, and you’re paying emergency rates while dealing with water damage, potential mold remediation, and possible structural repairs.
The tax refund window gives you a chance to be proactive. You can schedule work during a slower period for contractors, potentially get better rates, and ensure your home is protected before the wettest months hit. Many homeowners use refunds for discretionary purchases that don’t add lasting value. Basement waterproofing protects your largest investment while giving you usable living space and peace of mind during every storm.
Financing options exist for homeowners who need waterproofing but want to preserve their refund for other purposes. The key is addressing problems now, during the narrow window between winter damage and spring deluge, rather than waiting until water forces your hand.
5 critical post-winter basement waterproofing steps for Long Island homes
Spring maintenance starts with knowing what to check and when to call professionals. These five steps help you assess winter damage and protect your basement before thaw-related problems escalate. Some you can handle yourself with basic tools and observation skills. Others require professional expertise to diagnose correctly and fix permanently.
The goal isn’t to turn you into a waterproofing contractor. It’s to help you catch problems early when they’re still manageable and less expensive to fix. Each step builds on the previous one, creating a comprehensive assessment of your basement’s condition after winter stress.

Inspect foundation walls and floors for new cracks or damage
Start with a thorough visual inspection of your entire basement. Walk the perimeter with a flashlight, examining walls from floor to ceiling. Look for cracks you don’t remember seeing before winter, or existing cracks that appear wider or longer. Pay special attention to corners where walls meet and the joint where walls meet floors—these areas experience the most stress.
Hairline cracks might seem insignificant, but they’re pathways for water infiltration. Even small cracks let moisture through, and that moisture carries pressure behind it during spring thaw. Water doesn’t need a large opening to cause problems. It finds the path of least resistance and exploits it.
Check your basement floor too. Cracks in concrete floors often indicate foundation movement or settling that winter freeze-thaw cycles worsened. Floor cracks also provide entry points for groundwater rising through soil beneath your home. Long Island’s high water table means this upward pressure is a real concern, especially during spring when groundwater levels peak.
Document what you find. Take photos of cracks with a ruler or coin in the frame to show scale. Note their location and approximate size. This documentation helps professionals assess severity and track whether cracks are growing over time.
Not all cracks require immediate professional intervention, but all deserve professional evaluation. Foundation crack repair specialists who know Nassau and Suffolk County conditions can tell the difference between cosmetic issues and serious structural concerns. Vertical cracks are common and often result from concrete curing or minor settling. Horizontal cracks are more concerning because they suggest lateral pressure against foundation walls—exactly what happens when saturated soil pushes against your foundation during spring thaw. Diagonal cracks, especially those wider at one end, can indicate foundation movement that needs addressing before it worsens.
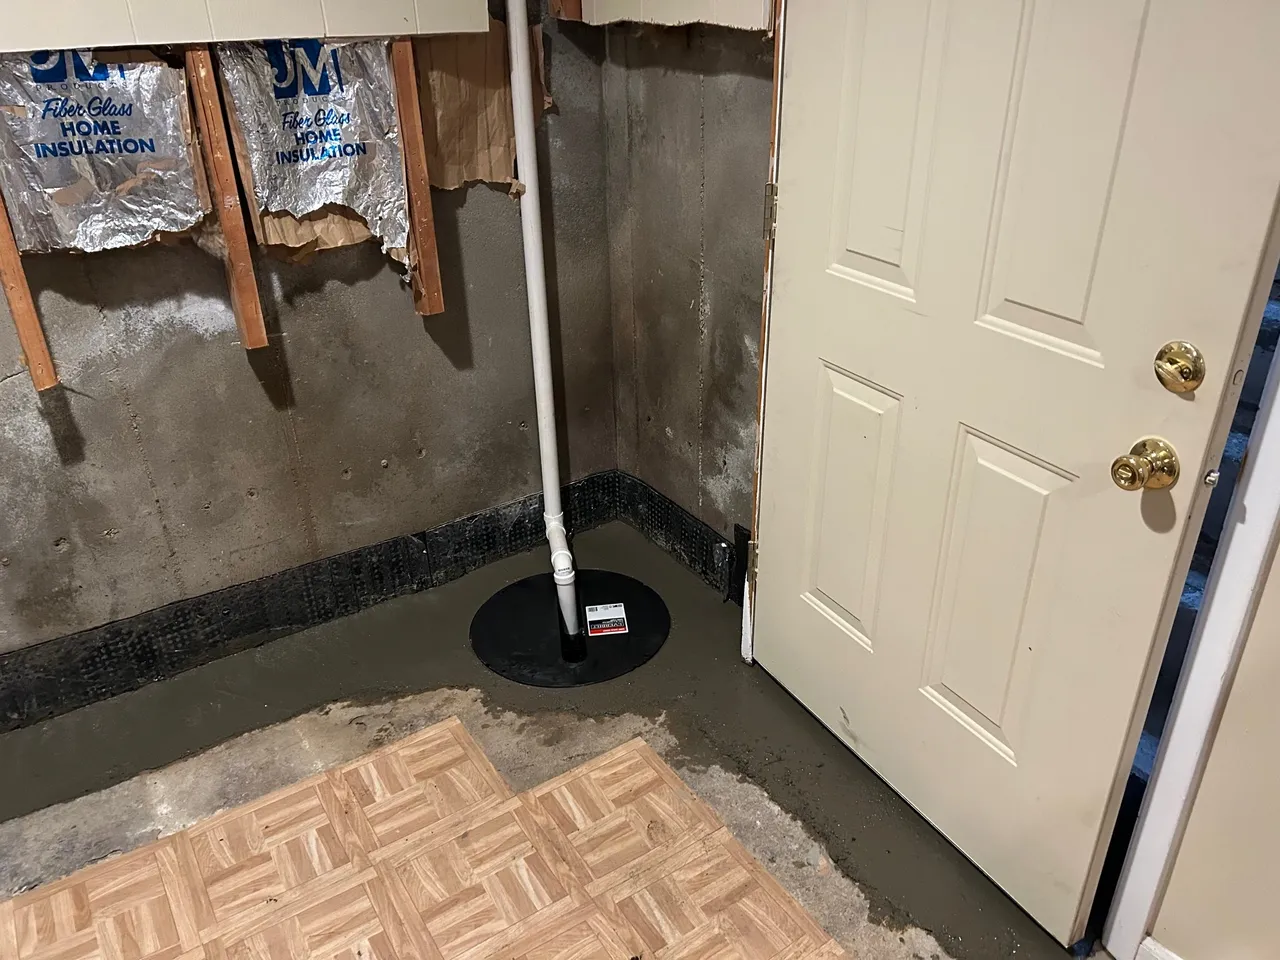
Test your sump pump and drainage systems before spring rains
Your sump pump is your basement’s first line of defense against flooding, but it can’t protect you if it’s not working. Spring is when you need it most, which makes pre-season testing critical. Many homeowners discover pump failure only when water is already accumulating—exactly when you can’t afford downtime.
Testing is straightforward. Pour several gallons of water into your sump pit until the float rises and triggers the pump. The pump should activate quickly, run smoothly without unusual noises, and discharge water through the outlet pipe away from your foundation. If it doesn’t activate, runs but doesn’t pump water, makes grinding or rattling sounds, or cycles on and off repeatedly, you need repairs or replacement before spring storms arrive.
Check the discharge line too. Make sure it’s not clogged with debris or ice, and verify that it directs water at least five to six feet away from your foundation. A discharge line that dumps water right next to your home defeats the purpose of the pump—you’re just recycling the problem.
Sump pump installation or replacement costs in Long Island typically range from $1,200 to $2,500 including the pump, basin, discharge piping, and professional installation. That’s significantly less than water damage from a failed pump during spring flooding. Sump pumps generally last seven to ten years with proper maintenance. If yours is approaching or past that lifespan, consider replacement before it fails during a storm.
Battery backup systems add another layer of protection. Spring storms often cause power outages, and your sump pump can’t run without electricity unless you have backup power. Battery systems keep pumping even when the grid goes down, protecting your basement during the storms most likely to cause flooding.
French drains and other basement drainage systems also need spring inspection. These systems collect water before it enters your living space and direct it to your sump pump or outside drainage. Check that drain openings aren’t clogged with debris, and ensure water flows freely through the system. Sluggish drainage means water will pool instead of evacuating, increasing pressure against your foundation walls.
Professional sump pump maintenance includes checking the float switch, testing the check valve, inspecting electrical connections, and verifying the pump’s capacity matches your basement’s needs. Undersized pumps can’t keep up with heavy water infiltration during spring thaw, while oversized pumps cycle too frequently and wear out faster.
Clear gutters and redirect downspouts away from your foundation
Gutters clogged with winter debris create problems the moment spring thaw begins. When gutters can’t channel water away from your roof, that water cascades down right next to your foundation—exactly where you don’t want it. One clogged downspout can dump hundreds of gallons directly against your basement walls during a single spring storm.
Clean gutters thoroughly before spring rains arrive. Remove leaves, twigs, ice dams, and any debris that accumulated over winter. Check that water flows freely from gutters into downspouts and that downspouts aren’t blocked. Run water through the system to test drainage and identify any leaks or sagging sections that need repair.
Downspout placement matters as much as gutter cleanliness. Your downspouts should extend at least four to six feet away from your foundation. If they’re dumping water right next to your home, add extensions or splash blocks to redirect flow. This simple step prevents thousands of gallons of roof runoff from saturating the soil around your foundation.
Consider the grading around your home too. Soil should slope away from your foundation at a rate of about one inch per foot for at least ten feet. This natural grading helps surface water drain away instead of pooling against basement walls. Winter freeze-thaw cycles can disrupt grading, creating low spots where water collects. Spring is the time to address these drainage issues before they contribute to basement flooding.
Window wells need attention as well. These below-grade areas around basement windows fill with snow and debris over winter. When spring thaw comes, that accumulated material blocks drainage and can direct water straight through your basement windows. Clear window wells completely and ensure they have proper drainage systems to handle spring runoff.
Article details:
- Published by:
- Diamond Masonry & Waterproofing
- Published to:
- Last modified:
- April 16, 2026
Share:
Continue learning: